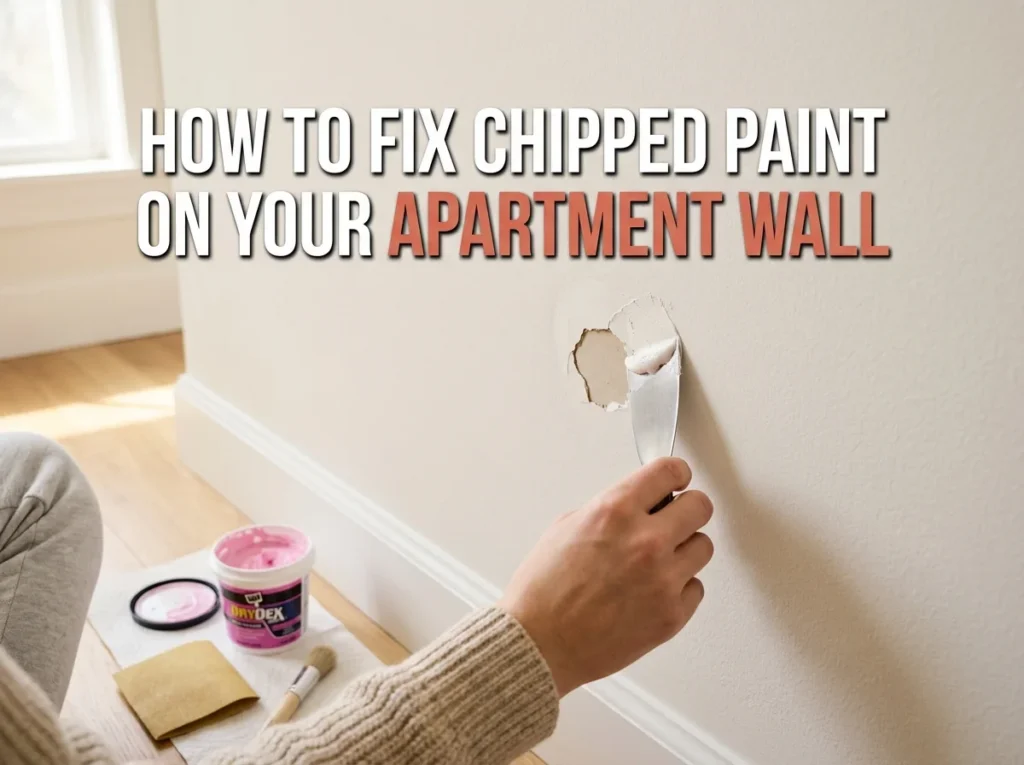
The fastest way to fix chipped paint on an apartment wall is to scrape off any loose paint, fill the chip with a small dab of lightweight spackle, let it dry for an hour or two, sand it smooth, and touch it up with matching paint. Most small chips can be fixed in under 30 minutes with about $15 in supplies from any hardware store. The tricky part for renters isn’t the fix itself. It’s everything around it. Matching paint when you don’t have the original can. Knowing if your lease actually lets you do this. Deciding whether to call maintenance or just handle it yourself. After painting and turning over thousands of apartment units across Columbus, the team at Surecoat Painting sees these same renter situations every week, and we’ll walk you through all of it.
Here’s everything you actually need to know, in the order you’ll need to think about it.
Stop. Read Your Lease First.
Before you grab a putty knife, take five minutes and pull up your lease. Look for anything that mentions painting, wall repairs, or alterations. Most leases fall into one of three buckets.
Some landlords explicitly forbid tenants from doing any painting or wall repair. If yours does, your options shrink to either calling maintenance or just leaving the chip alone and accepting whatever deduction comes at move-out.
Some leases are silent on it, which usually means small touch-ups are fine but you need to use the original color and finish. This is the most common scenario for apartments.
And some landlords actually require you to fix chips before move-out and will charge you if you don’t. In this case, fixing it yourself is almost always cheaper than letting them do it.
If your lease isn’t clear, send your property manager a quick text or email. Something like, “Hey, there’s a small paint chip on the bedroom wall. Is it okay if I patch and touch it up myself, or would you prefer maintenance handle it?” That email also creates a paper trail, which protects you later if anyone tries to charge you a “wall damage” fee at move-out.
Should You Call Maintenance or Just Fix It Yourself?
Honest answer: it depends on the size of the chip and how much you trust your building’s maintenance crew.
For a chip smaller than a quarter, just fix it yourself. Maintenance might take two weeks to get to it, and they’ll often do a worse patch job than you would, then mark “wall repair” on your file. Not great.
For a chip bigger than a credit card, or one with cracking around the edges, call it in. That’s beyond cosmetic and might point to moisture or settling behind the wall. Let the building deal with the cause, not just the surface.
For anything in between, call your property manager and ask for the exact paint code and brand. Some apartments will tell you, some won’t. The ones that do are basically inviting you to handle it yourself, which is a win for everyone.
Why Apartment Walls Chip in the First Place
A few specific reasons we see all the time in Columbus apartments.
Builder-grade paint. Most apartments use the cheapest flat or eggshell paint the property can buy, applied in a single coat, often over a wall that wasn’t cleaned or primed properly. This kind of paint chips if you look at it wrong.
Moving furniture in and out. Dorm-style furniture, IKEA dressers, second-hand couches. They scrape walls during every move. Corners and door frames take the worst of it.
Renters living with kids or pets. Toys, leashes, claws, footballs. We’ve patched walls in apartments where you can literally see the height of a four-year-old in the chip pattern.
Humidity in older units. Steamy showers in apartments with bad ventilation soften the paint near bathrooms. Same with kitchens that have no exhaust fan. Over a year or two, the paint loses its grip and starts flaking off in small chips.
Stickers, command strips, and tape. Half the chips we see at move-out are from someone pulling off a poster mount and taking a chunk of paint with it.
None of these mean you damaged the wall on purpose. But they will still cost you your deposit if you don’t deal with them before the walkthrough.
The Renter’s Minimal Tool Kit (Under $20)
You don’t need a full painter’s setup for this. Here’s the entire shopping list for fixing a small apartment paint chip, and all of it fits in a kitchen drawer when you’re done.
A 1-inch putty knife, around $3. A small tub of lightweight spackle, like DAP DryDex (the pink stuff that turns white when it’s dry), around $5. A small piece of 220-grit sandpaper, around $1. A small art brush or foam brush, around $2. A paper plate to use as a paint tray. A clean rag. And a small sample pot of matching paint, which is the part we’ll talk about next.
Total cost, around $15. Total storage space, less than a shoebox.
How to Match the Paint When You Don’t Have the Original Can
This is the part everyone messes up.
The single best move is to ask your property manager for the paint brand, color name, and sheen. Many apartment complexes use one or two standard colors across all units. The most common in Columbus rentals is Sherwin-Williams Pure White or Benjamin Moore Decorator’s White in flat or eggshell. If maintenance gives you the code, you’re set. Take it to Sherwin-Williams, ask for a small sample pot (around $8), and you’re done.
If they won’t tell you, do this instead. Carefully break off a dime-sized chip from the loose paint on the wall (or a hidden spot like behind a door). Take that chip to Sherwin-Williams or Home Depot. Both stores have computerized color matching machines that will scan your chip and mix you a sample. It’s not always a 100 percent match, but it gets close enough for a small touch-up.
One thing nobody tells renters: even a perfect color match won’t always look perfect on the wall. Original paint ages and shifts color from sun, dust, and time. Fresh paint, even of the exact same code, will look slightly brighter against an old wall. That’s normal. We’ll cover how to blend it in the next section.
Also, match the sheen. Flat paint looks dead matte. Eggshell has a tiny shine. Satin looks slightly glossy. If you use the wrong sheen, the patch will catch light differently and stand out worse than the chip did. When in doubt, go with flat or eggshell because that’s what 90 percent of apartments use.
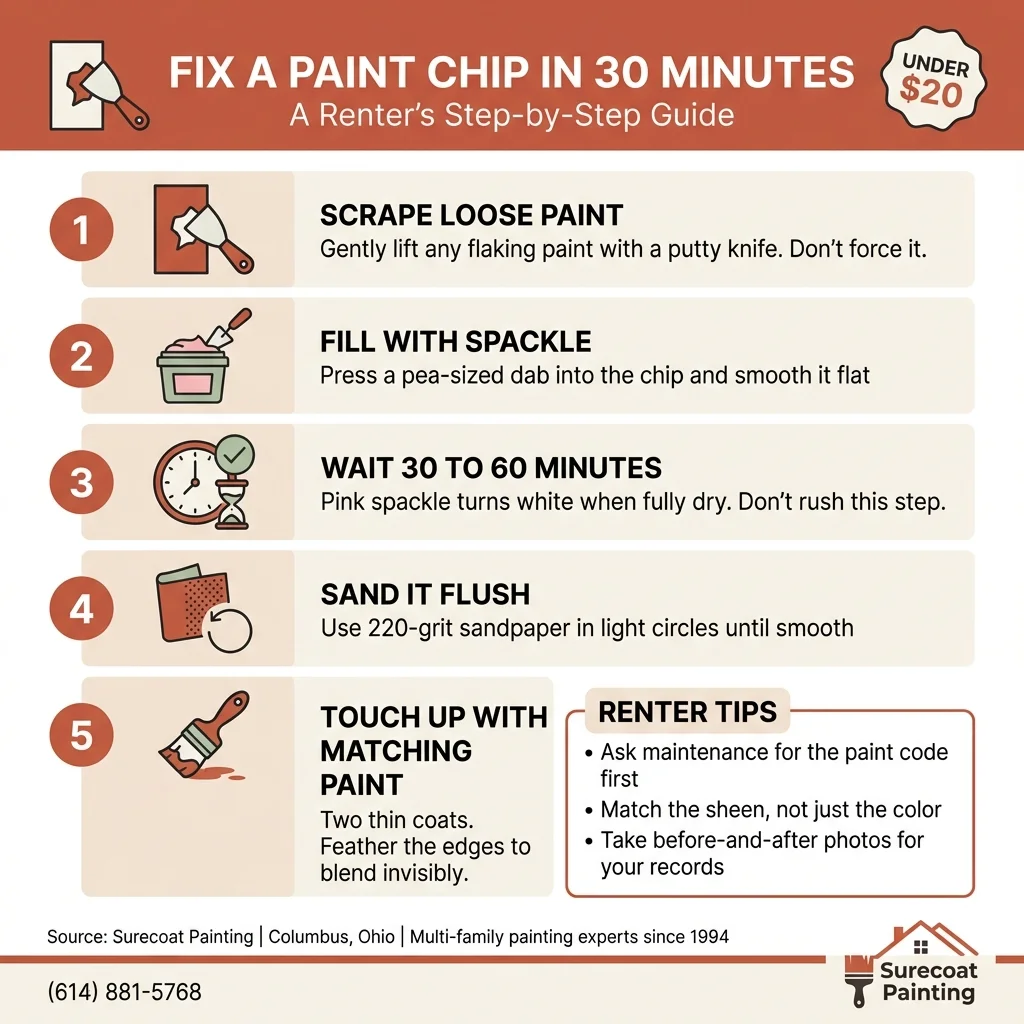
Step-by-Step: Fix the Chip in About 30 Minutes
Now the actual fix. This is the part the AI overviews and most other blogs cover, so I’ll keep it tight and real.
Step one. Use the putty knife at a low angle and gently lift off any paint that’s still loose around the chip. If it doesn’t come off easily, leave it. You’re not trying to make the chip bigger, just to remove the bits that will keep falling off later.
Step two. Scoop a small amount of spackle onto the tip of your putty knife. About the size of a pea is enough for most chips. Press it into the chip and smooth it across so it’s level with the surrounding wall. Don’t pile it on. A thin, flat layer is better than a thick mound.
Step three. Let it dry. Lightweight spackle on a small chip is usually firm in 30 to 60 minutes. If you used DryDex, the pink color will fade to white when it’s fully dry. If the patch still feels cool or soft to the touch, give it more time. Sanding too early just smears it.
Step four. Lightly sand the patch with 220-grit sandpaper. Use a circular motion and stop the second it feels flush with the wall. Over-sanding will scoop out the spackle and you’ll have to refill. Wipe the dust off with a slightly damp rag.
Step five. Prime if you have it, paint if you don’t. Real talk: for a chip smaller than a quarter, you can skip primer and just dab on two thin coats of your matching paint with a small brush. Use the corner of the brush, not the flat side, and feather the edges outward so the new paint blends into the old. Wait for the first coat to dry fully before applying the second. Patience here is what separates an invisible patch from one that looks like you put a sticker on the wall.
The Move-Out Touch-Up Strategy
If you’re reading this because you’re about to move out, here’s the order of operations that saves the most deposit money.
Walk the apartment with a notepad two weeks before move-out. List every chip, scuff, nail hole, and dent you can see. Then split that list into three groups. Stuff you can fix yourself (small chips, nail holes, light scuffs). Stuff that needs maintenance (anything bigger than a credit card, water damage, deep cracks). Stuff that’s pre-existing from when you moved in and is on your move-in checklist (do not fix this, you’ll just confuse the situation).
Fix the small stuff yourself first. Save the matching paint cans because you might need touch-ups after the patches dry. For nail holes, use the exact same spackle process as chips, just on a smaller scale.
Take photos before and after every fix. If your landlord later claims you damaged the wall, you have a record showing the chip was there and you handled it.
When the Chip Is Too Big to DIY
Be honest with yourself. If the damaged area is bigger than the palm of your hand, or if there’s drywall paper showing under the chip, or if there’s water staining around it, this is no longer a DIY situation. Call maintenance and get it documented in writing. A bad DIY patch on a serious problem makes the situation worse and can void your deposit faster than just leaving it alone.
The same goes for any chip where you can see plaster, drywall studs, or paper underneath. That’s structural, not cosmetic. Don’t try to spackle over that.
How to Stop Walls From Chipping in the First Place
A few habits that protect your walls and your deposit during the rest of your lease.
Use felt furniture pads on anything that touches a wall. Couches, dressers, beds. Five bucks at any dollar store.
Skip nails when you can. Command strips and 3M removable hooks come off without taking paint with them, as long as you follow the slow-pull instructions on the package.
Hang large frames with the proper picture hangers, not just a single nail. The weight distribution matters.
In bathrooms, run the exhaust fan during and for ten minutes after every shower. If your bathroom doesn’t have a fan, crack the door open. Trapped steam is the number one reason bathroom walls peel.
In kitchens, wipe down walls behind the stove every few weeks. Cooking grease eats paint over time.
And if you have kids or active pets, install a chair rail or vinyl wall guard in the hallway. It’s a $30 investment that can save you hundreds at move-out.
Bottom Line
Fixing a chipped paint spot in an apartment is one of the easiest, highest-return DIY moves a renter can make. Total cost is under twenty bucks. Total time is under an hour. The reward is keeping a security deposit that might be worth more than a month of rent.
The real skill isn’t the patching itself. It’s the small stuff around it. Reading your lease before you start. Asking maintenance for the paint code instead of guessing. Matching the sheen. Feathering the edges. Documenting your work with photos. Get those right and your wall looks like the chip was never there in the first place.